Introduction
There are 3 primary actions that constitute a majority of tickets.
They include:
- Shipping and receiving to and from the data center.
- Requiring technical or non-technical Remote Hands help in the data center.
- Providing or removing access to the data center for employees, vendors or tours.
The user experience is optimized to provide simplified access to these tickets types, with some adjunct functionality for ordering product, or reporting maintenance requests.
Video Tutorials
Quick User Guide
Home
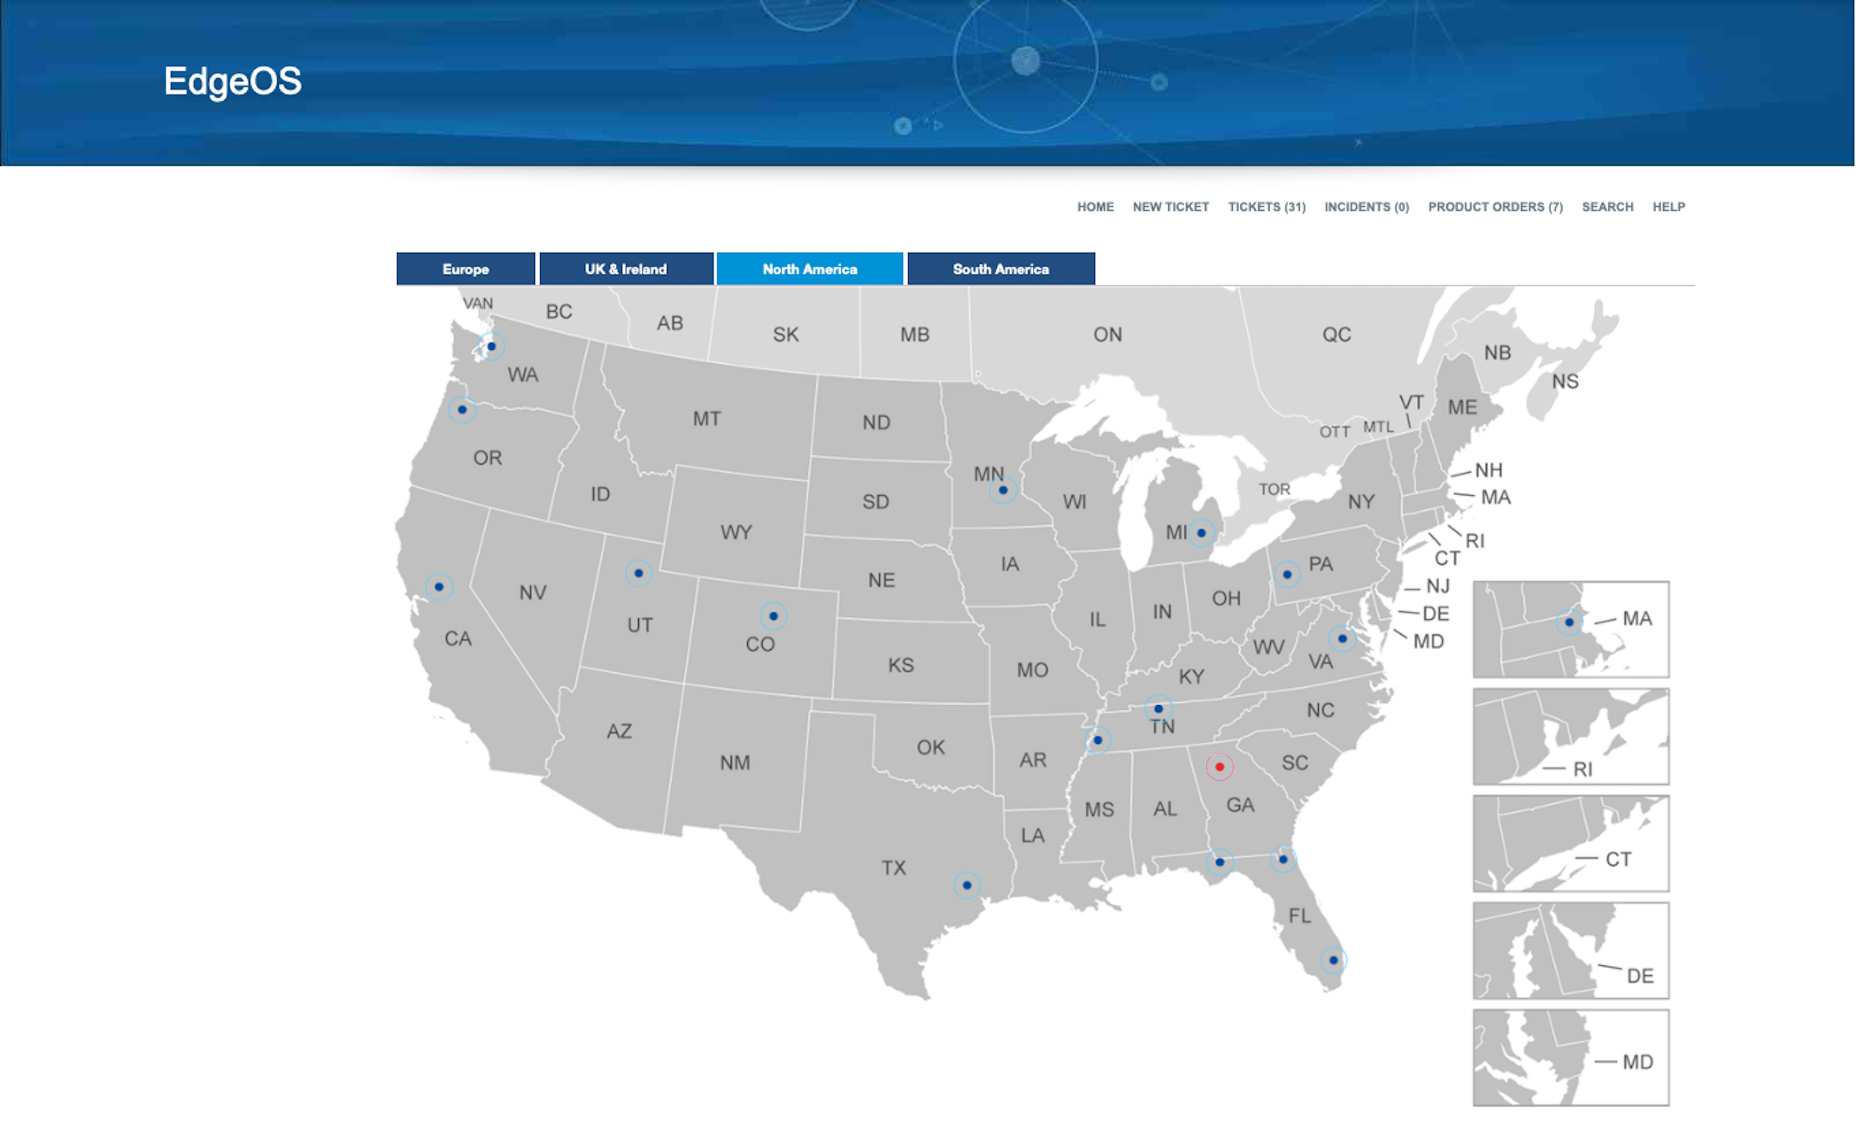
The Home application provides a complete view of the operations of each data center you occupy by pinpointing them on any of four regional maps:
North America, South America, UK & Ireland, and Europe.
- Data Center Colors indicate the status of the data center:
- Blue - indicates that the data center is performing as expected.
- Red - indicates that the data center has an open incident.
Data Center Dialog Box
-
By clicking on a data center pin, a static pop-up dialog box will appear to display that data center's current site information and performance.
The top half of the dialog box displays the data center's city of location and street address.
The bottom half of the dialog box displays the following customer-specific performance data:
- Allocated Capacity: The total power distributed to customer racks.
- Real Time Load: The total real time load of kW for a customer's racks in a data center as a percentage of allocated capacity.
- Open tickets: The number of open tickets for this data center.
- Open incidents: The number of open incidents for this data center.
-
Along the bottom of the Data Center Dialog box are four application icons:
-
[Optional]
Data Center Floor Plan - displays your organization's equipment in a floor plan of the data hall.
-
[Optional]
Submit a Ticket for the Data Center - sends you to the New Tickets page to select a ticket type you want to submit for the selected data center.
See Submit a Ticket for further instruction.
-
[Optional]
Cross Connect - displays all Cross Connect panels and connections your company owns within the data center.
-
[Optional]
MOPs - displays all MOPs ("Methods of Procedure"), in the data center that pertain to your equipment.
-
[Optional]
RPPs - displays the list of RPPs and their associated Panel Schedules that are owned by the customer.
-
[Optional]
Circuit Power Loads - displays any anomalies of unbalanced circuit loads across redundant feeds.
-
[Optional]
OnSite Finder - Lists any of the customer's employees currently on site.
- Google Maps - opens Google Maps to show the location of the specific data center and provide directions.
[Optional]
items are based on customer-defined settings for each user and as such may or may not be present:
|
 |
Ticketing
The EdgeOS Ticketing System simplifies how you submit, monitor, respond, and resolve ticket submittals.
The following applications are used in ticket management:
- New Ticket
- Tickets
- Incidents
- Product Orders
- Search
Ticket Types
- Tickets for shipping to and delivery from the data center.
-
Tickets requiring
Technical
or
Non-Technical
Remote Hands help in the data center.
-
Tickets adding or removing employees, vendors or tour visitors to the data center.
Types include:
- Authorize Site Access - request personnel PIN access for a data center.
-
Entrants needing re-authorization into a data center do not require the user to use the Add PIN Request section.
A name and phone number in the description field will suffice.
- You cannot add a PIN Request to a ticket until all ticket required fields are entered.
- You must enter all required personnel and visit information in order to add a PIN Request to a ticket.
- You must choose from a list of specific company-occupied data centers.
- You must choose the duration of visit (i.e. length of time for PIN access).
- You can add multiple PIN Requests to one ticket.
- You can edit and remove added PIN Requests to a ticket.
- Deauthorize Site Access - request a PIN Disable for personnel authorized to access a data center.
- You can only deauthorize an entrant who is "On Behalf Of" your company.
- You cannot add a PIN Disable request to a ticket until all ticket required fields are entered.
-
You can deauthorize personnel for all or individual data centers.
To deauthorize personnel from specific data centers, and not all, you must specify that in the Other Instructions field of the PIN Disable window.
- You can request multiple deauthorizations for one ticket.
- Tour - request a tour in a data center.
-
You must enter a date in Requested Target Date field for the tour.
After submission, EdgeConneX will respond with a Firm Order Commit Date (i.e. the set date for the tour).
- Customer Feedback - quality improvement feedback.
- Property Management Maintenance - ticket pertaining to non-data floor spaces of data centers being serviced in (i.e. lobbies, loading docks, storage spaces, and bathrooms).
Submit a Ticket
The New Ticket menu bar application is how you will create and submit new tickets regarding your serviced equipment into EdgeOS.
There are 3 steps to ticket creation:
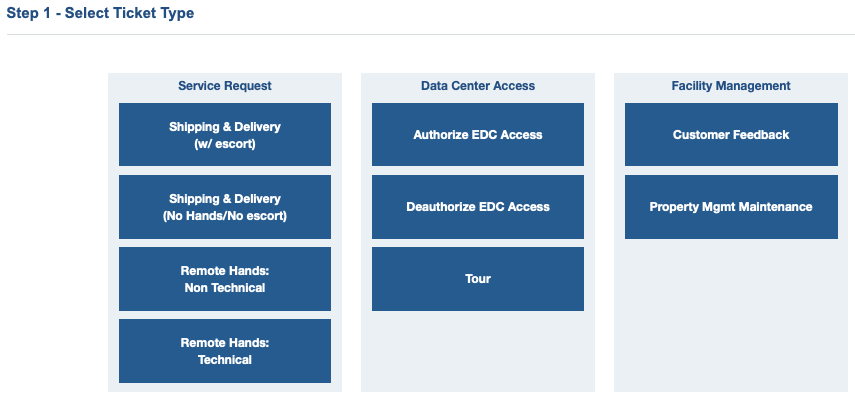
- Step 1 - Select a Ticket Type
- Click on one of the ticket type options in the New Ticket window.
|
 |
|
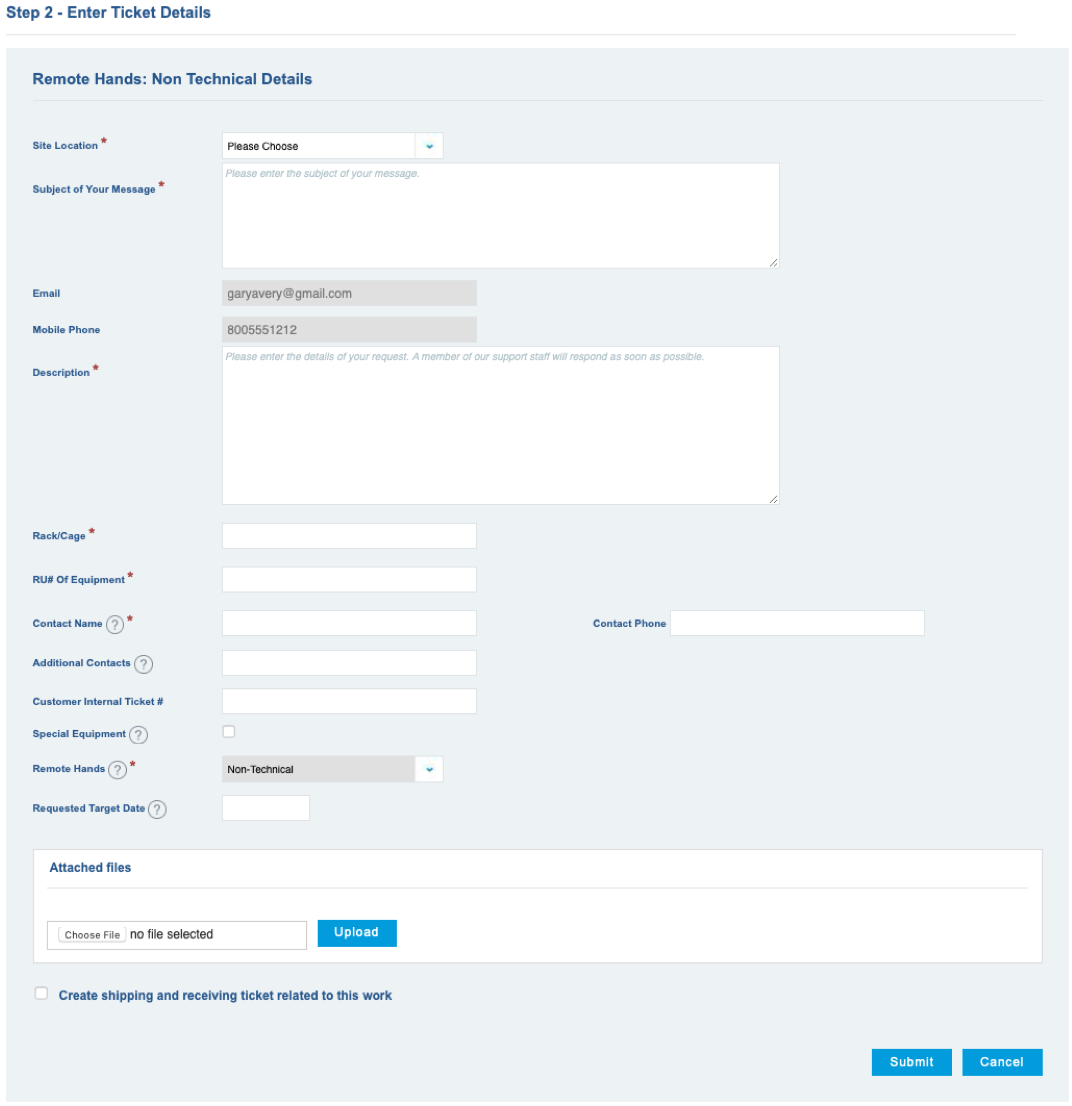
- Step 2 - Enter Ticket Details
|
 |
|
- Step 3 - [Optional] Adding Shipping & Delivery Information to a Non-Shipping & Delivery Ticket
- Creates a new Shipping & Delivery ticket that references the Non-Shipping and Delivery ticket.
|
 |
Once a ticket is submitted, those designated to receive notifications within EdgeOS will be notified.
Any additional contacts provided within the ticket will also be notified.
View and Manage a Ticket
The Ticket menu bar application compiles all tickets regarding data centers you are being serviced in.
This tool is good for viewing a ticket's details and status.
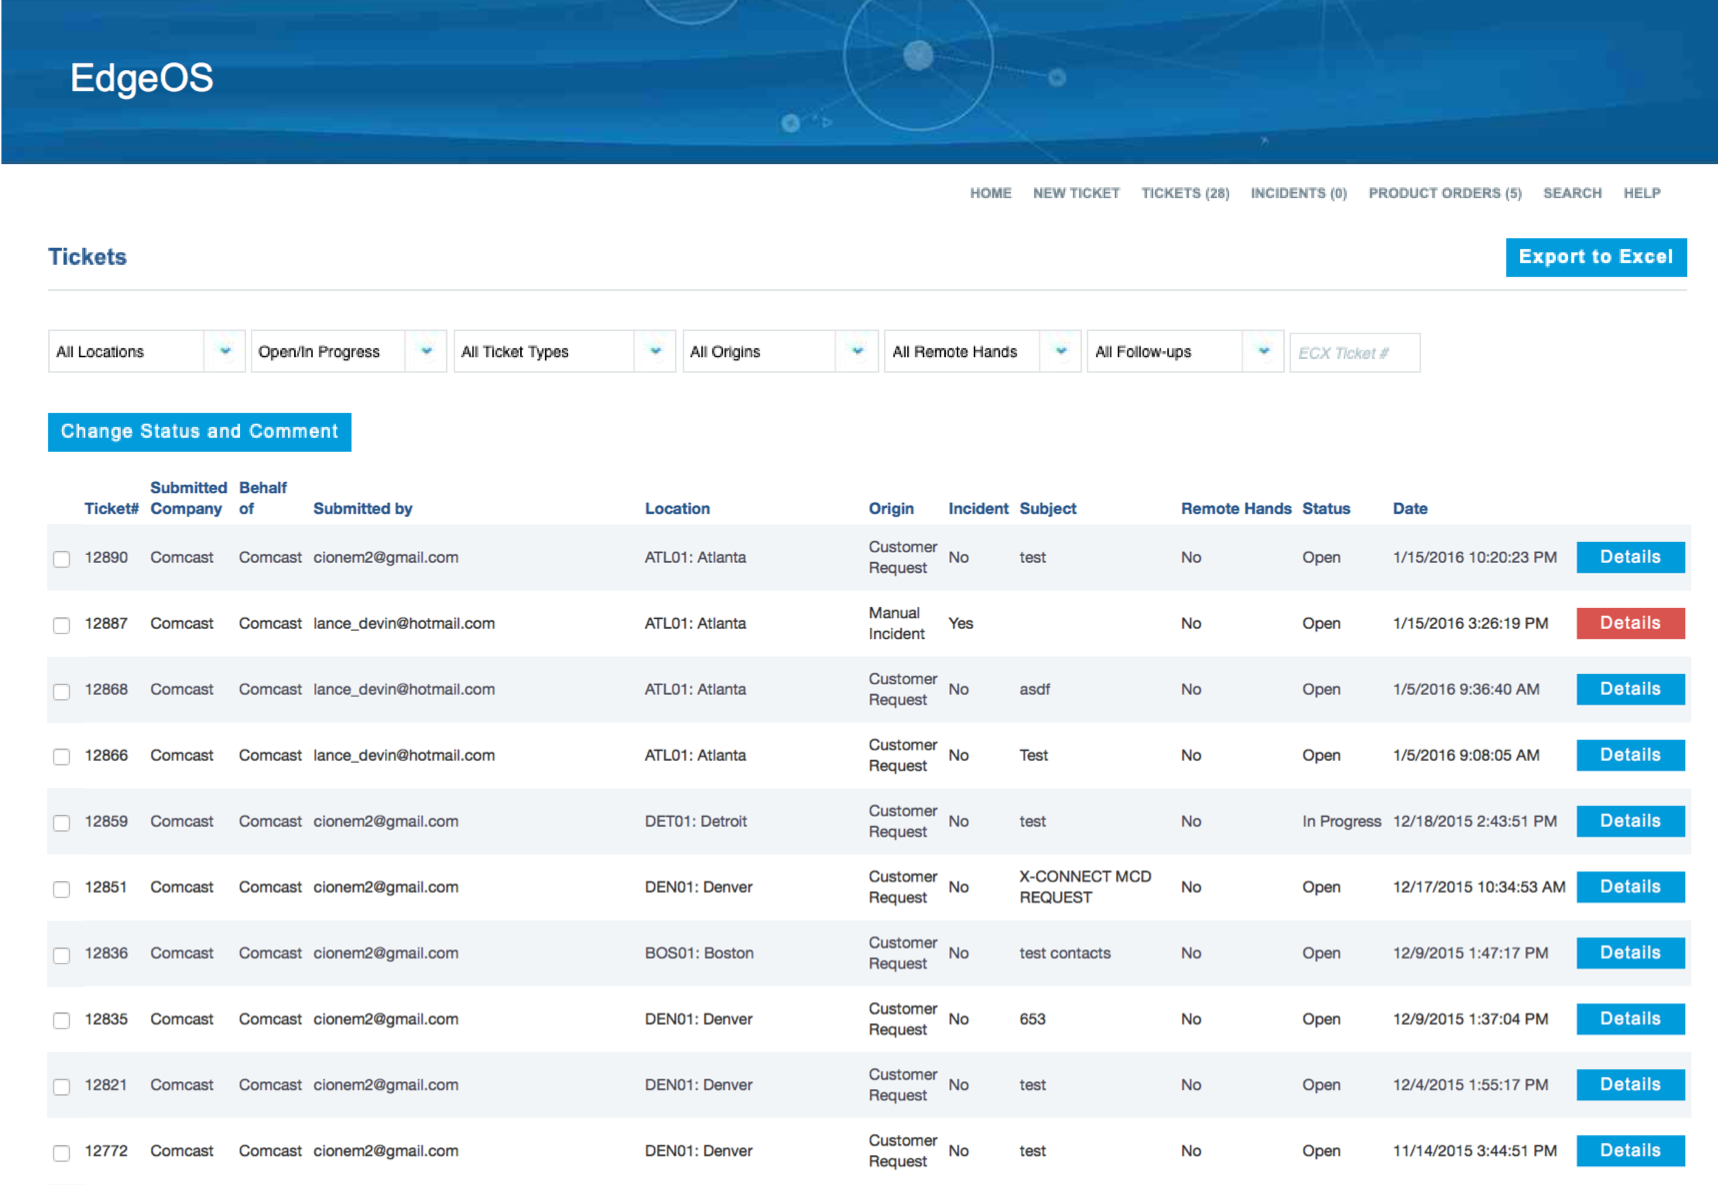
- When clicking the Tickets application, you will open a table displaying all tickets regarding or affecting occupied-data centers.
- The top dropdown search criteria allow you to filter the table by:
- location
- status
- ticket type
- origin
- remote hands
- ticket#
- The table is organized with the most recent tickets at the top of the table.
- By clicking the Export to Excel button at the top-right, you can export the table into an Excel spreadsheet.
|
|
Ticket Table
Each column is listed as a common ticket identifier and may be sorted, and/or reverse sorted, by clicking on the column header.
These identifiers include:
| Ticket Identifier |
Description |
| Ticket# |
The automatic number that a ticket is given at the time of submission. Use this to reference a ticket. |
| Submitted Company |
States the company that the ticket submitter represents and operates On Behalf Of. |
| Submitted by |
Automatically populated with your login information and associates you to the ticket. |
| Location |
Displays the Site Code and location of the data center that the ticket is regarding. |
| Origin |
A ticket can have four origins:
- Customer Request - A Customer Request origin is a customer-submitted ticket requesting products, site access, remote hands, or other services at a data center.
- Facility Manager - A Facility Manager origin is an automatically generated ticket created in response to an alarm or issue within a data center.
- Internal Request - An Internal Request origin is a ticket created and submitted by EdgeConneX personnel.
- Manual Incident - A Manual Incident origin is an incident that was manually submitted by an EdgeOS user.
|
| Incident |
"Yes" the ticket is an Incident or "No" the ticket is not an Incident. |
| Status |
Open, In-Progress, Cancelled, or Completed. Defined in Field Definitions (Core). |
| Date |
The date and time the ticket was submitted on. |
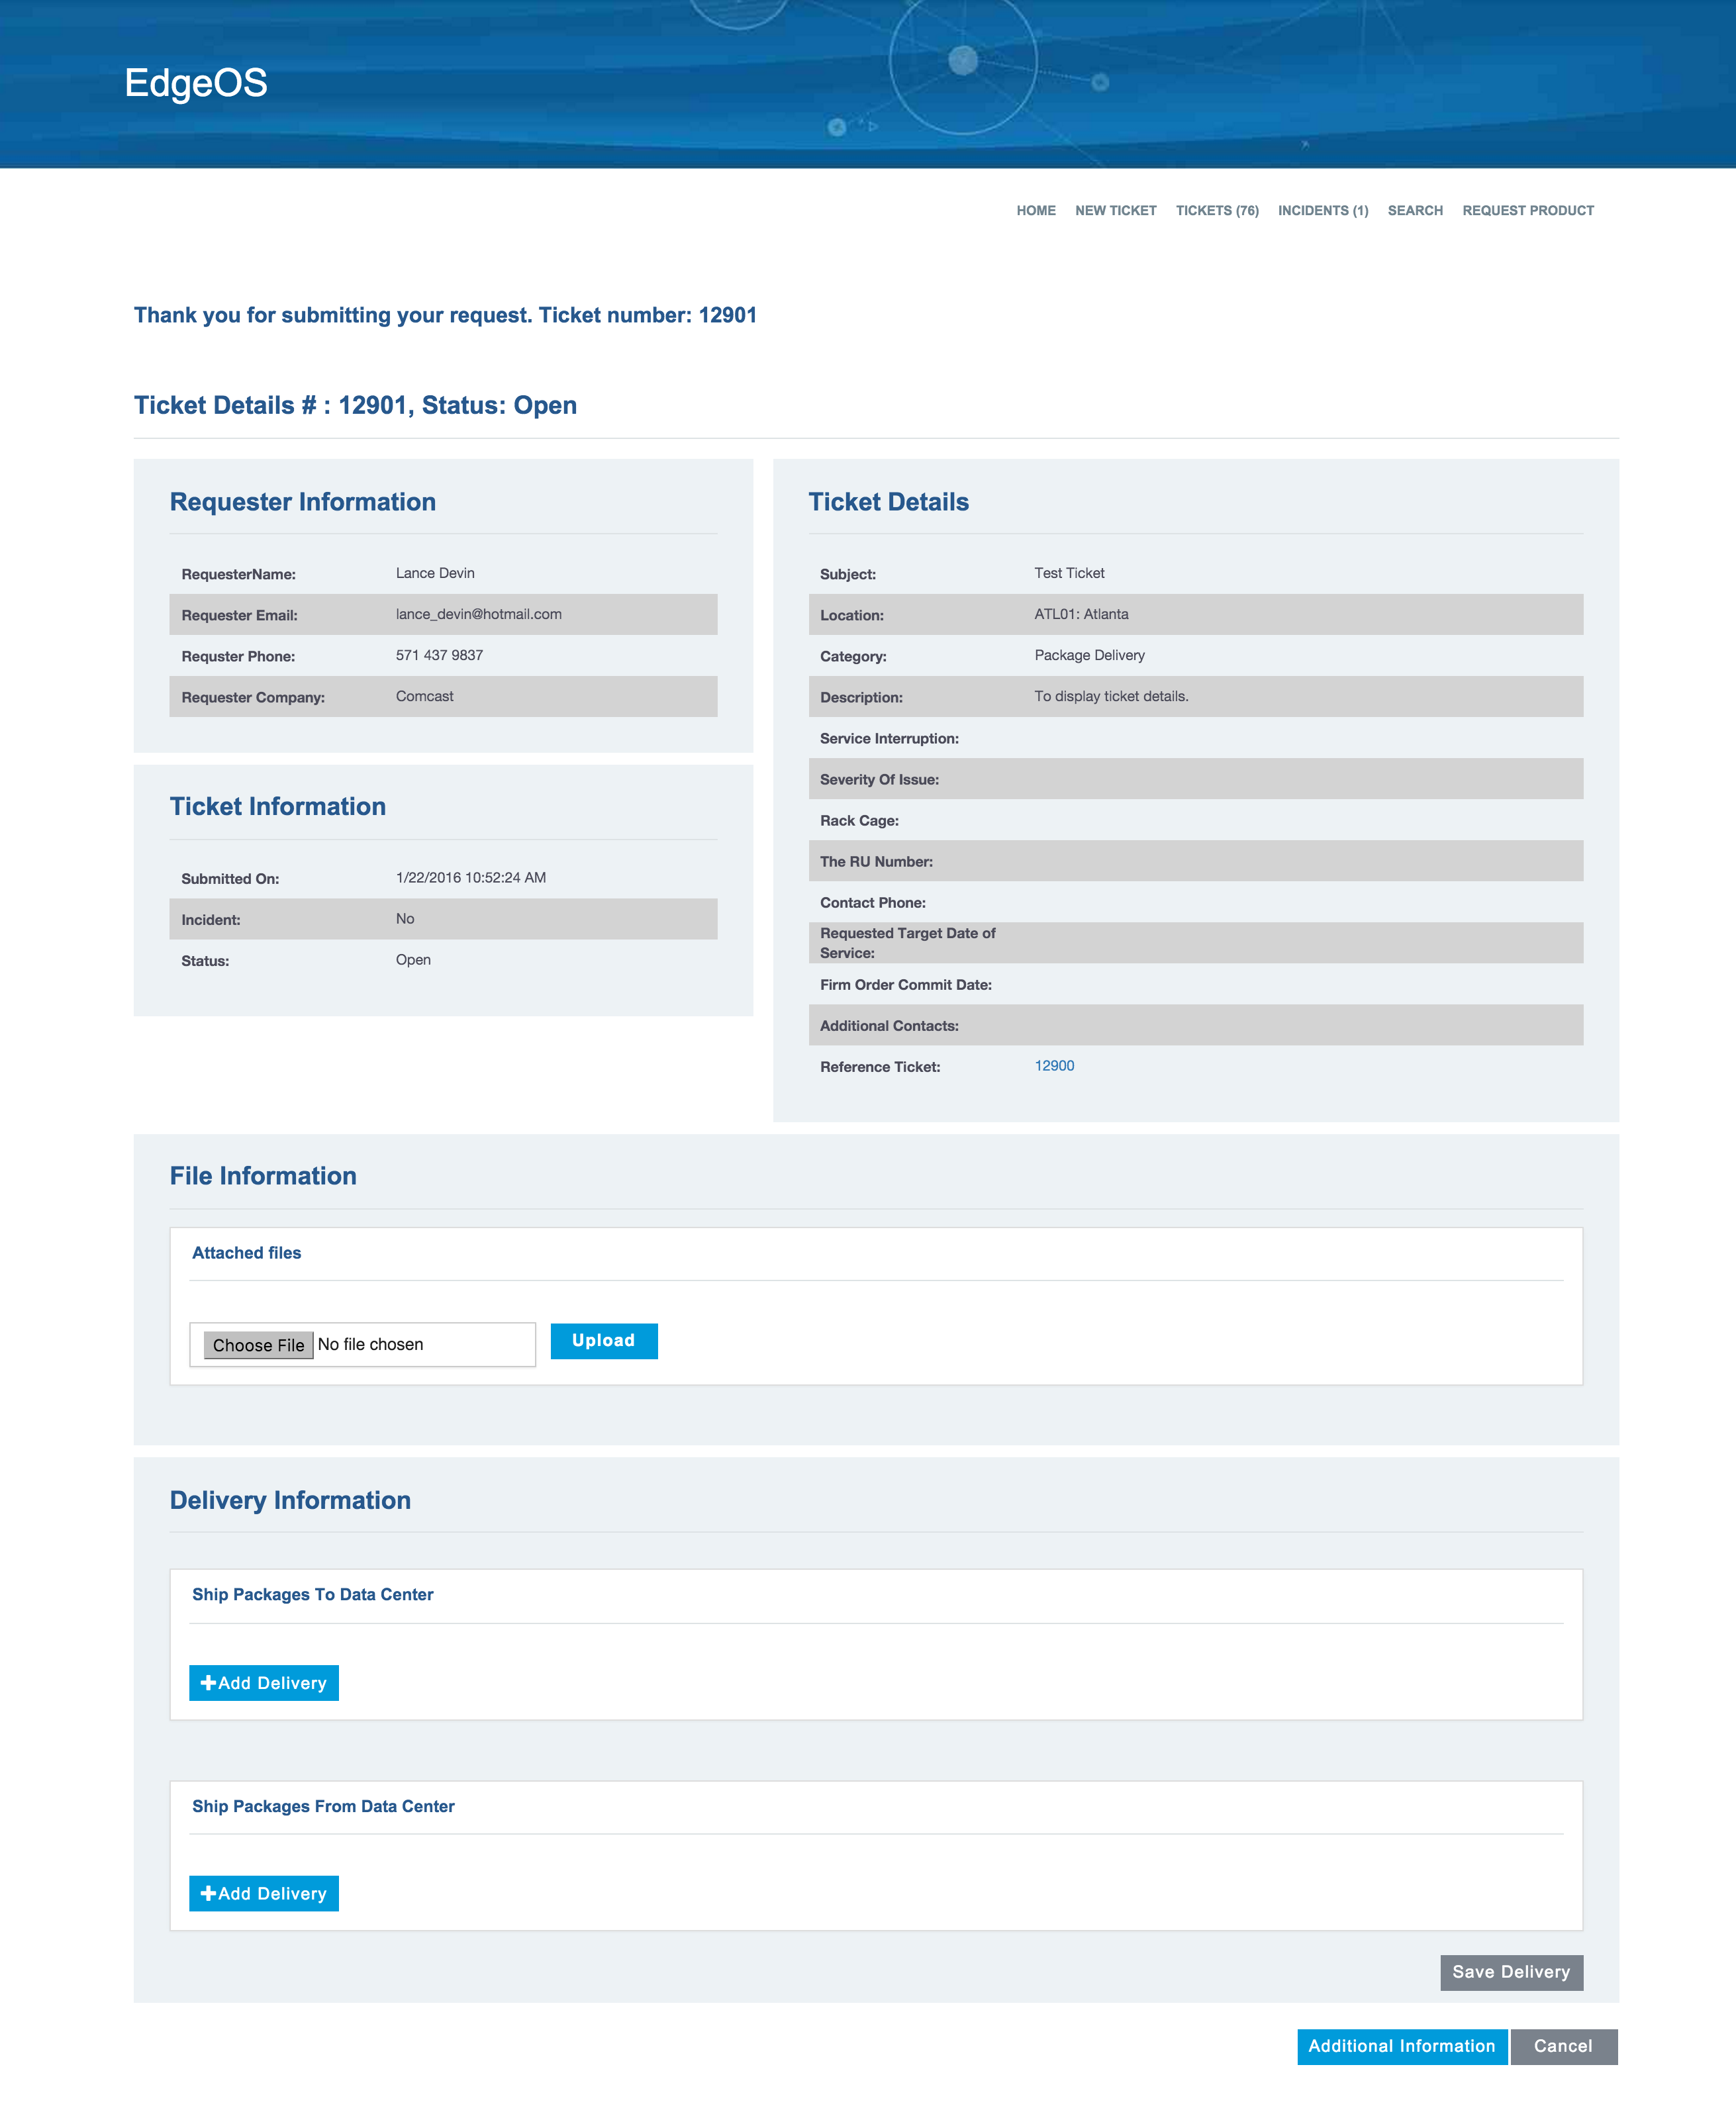
Ticket Details
To access the Ticket Details for listed tickets in this table, click on the Details button.
The Ticket Details are broken down into key categories:
- Requester Information
- Ticket Information
- Ticket Details:
- For descriptions of common ticket details, please see Field Definitions (Core).
- For descriptions of ticket-specific details, please see Field Definitions (Non-Core).
- Additional Shipping and Receiving Tickets - blue clickable reference numbers for all related Shipping & Delivery tickets in the Reference Ticket field.
- File Information - view or attach a file to the ticket
- Comments - view or add comments to the ticket
- Delivery Information
-
By clicking the Add Delivery under Ship Packages To Data Center or Ship Packages From Data Center,
you can add a related Shipping & Delivery ticket.
- Actions:
- Additional Information: Click to enter customer comments.
- You can add a Related Shipping & Delivery Ticket to any Non-Shipping & Delivery ticket type.
|
 |
Search
The Search application allows you to search for tickets, incidents, and product orders within EdgeOS based on defining ticket/incident/product order details.
For descriptions of common ticket details, please see Field Definitions (Core).
For descriptions of ticket-specific details, please see Field Definitions (Non-Core).
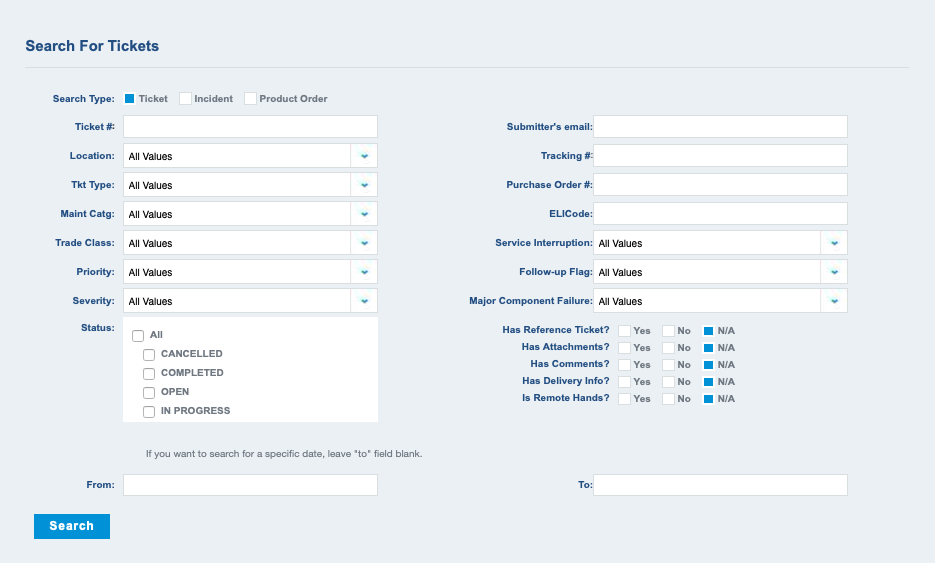
The most common search criteria are:
| Search Criteria |
Description |
| Search Type |
The search is regarding a ticket, incident, or product order. For example, by choosing Incidents, you will search for just incident tickets. |
| Ticket # |
The EdgeConneX provided reference number for an individual ticket. |
| Location |
Search for tickets based on what occupied site they are affecting. |
| Tkt Type |
The type of ticket the search is regarding. |
| Maintenance Category |
The subcategory of maintenance types as they pertain particularly to property management tickets. |
| Priority |
The priority assigned to the ticket as self described in the dropdown. From Emergency through to Priority 3. |
| Severity |
The ticket or incident's issue is Critical or Non-Critical. |
| Status |
Status options include: All, Cancelled, Completed, Open, and In-Progress.
Search for a single type of status or a combination of statuses by clicking the respective checkboxes.
Selecting All will search for all ticket statuses.
|
| Submitter's email |
The email of the individual who submitted a ticket. |
| Tracking Number |
If a shipping ticket has a customer entered tracking number, the tracking number can be used to find the EdgeOS Ticket. |
| ELICode |
If a ticket is related to critical equipment and it has been tagged as such, the ELICode will find the EdgeOS Ticket. |
| Service Interruption |
The ticket is regarding a Service Affecting or Service Non-Affecting issue. |
| Follow-up Flag |
Find tickets that have been flagged by EdgeConneX for follow-up -- Yes/No. |
| Has Attachment? |
If a ticket does have an attached file, does not have an attached file, or does not apply. |
| Has Delivery Info? |
If a ticket does have delivery information, does not have delivery information, or does not apply. |
| Is Remote Hands? |
If a ticket does have Remote Hands service, does not have Remote Hands service, or does not apply.
If chosen you will be prompted for technical or non-technical.
|
| From/To Dates |
To search for tickets submitted on a specific date, enter the date into the From field.
To search for tickets submitted between two dates, enter the two dates into the From and To fields.
|
Incident Type
[Incidents Only] |
Only when searching for incidents, you will be able to search for Alarm Incidents or Manual Incidents.
- Alarm Incident - the incident was generated from an automatic alarm system within the data center.
- Manual Incident - the incident was generated by an EdgeOS user.
|
Product Orders
Product orders are equipment and technology orders you can submit for a data center you occupy.
By submitting a Product order, your request will be sent directly to the EdgeConneX Sales team for processing.
You should expect to be contacted by an EdgeConneX Sales representative shortly after submitting a Product order with product details, data center available power & space,
and pricing.
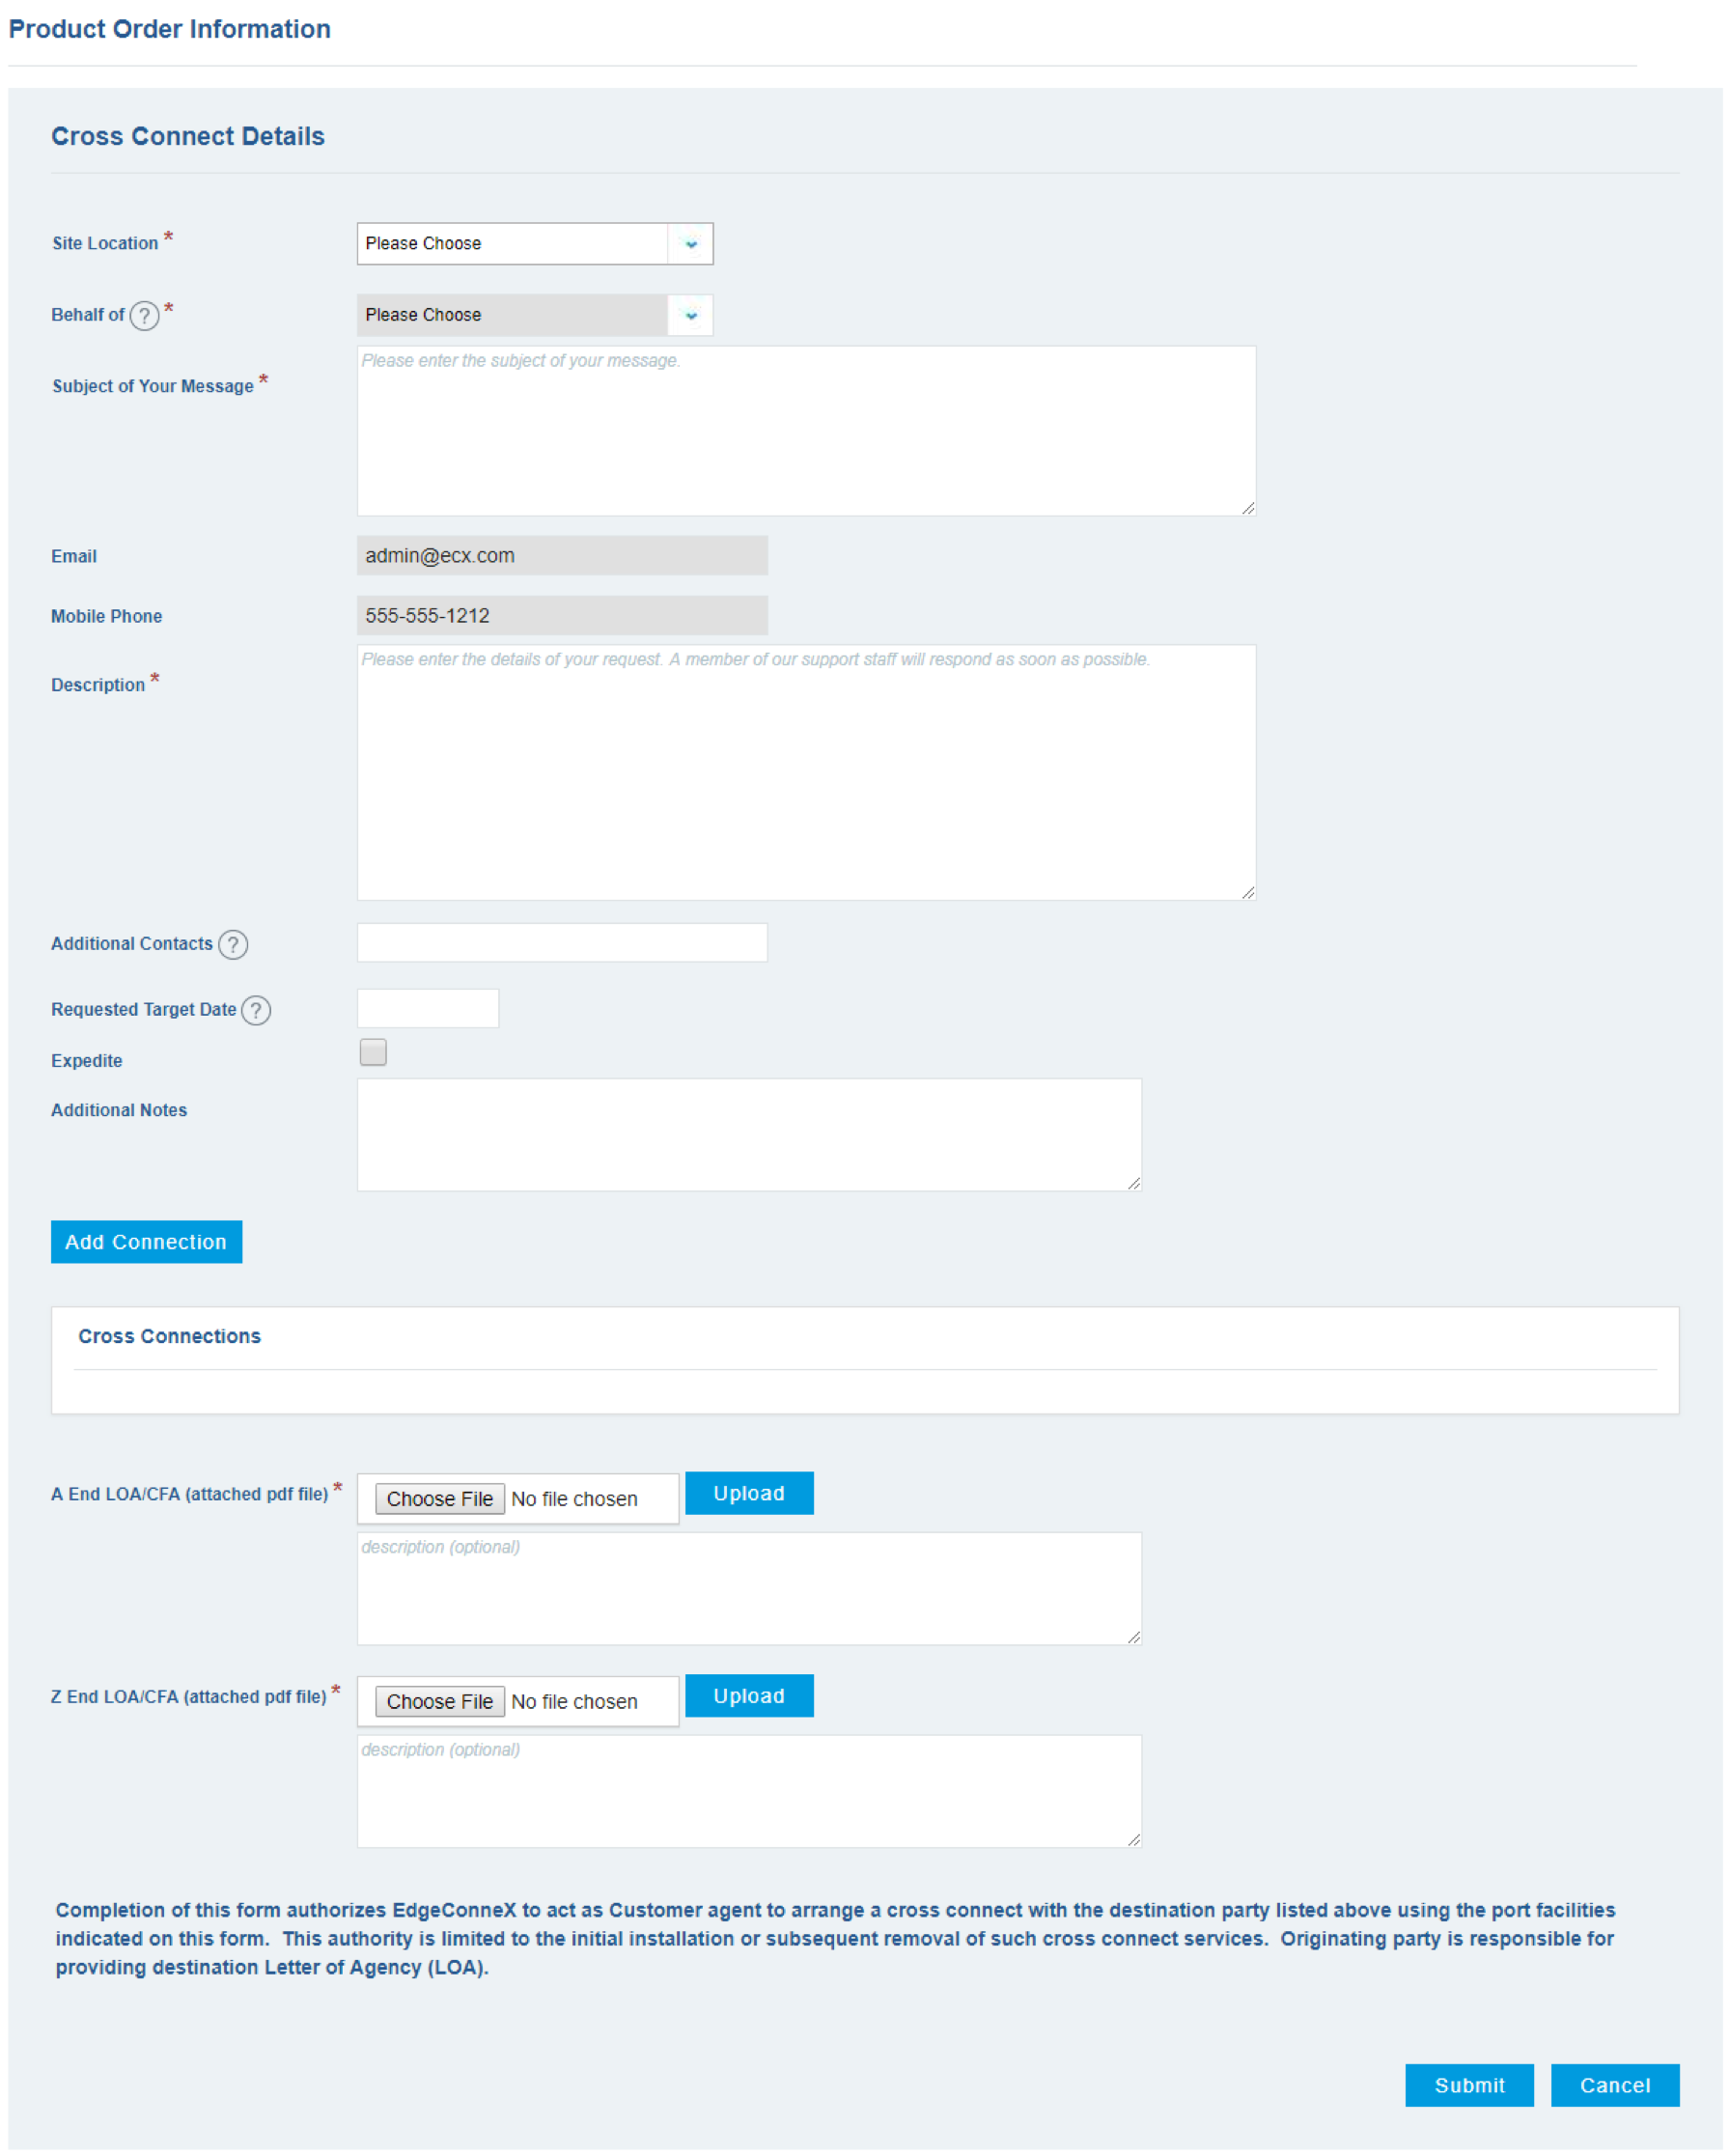
Product Order Types
- Interconnection Services
- Cross Connect - Request additional Cross Connect.
- Includes fields specific to Cross Connect services:
- Cross Connect Type - Type of cross connect.
- A End Port Assignments - A Side connection for the Cross Connect.
- A End Connector Type - Type of cables used on the A Side/Beginning of the Cross Connect.
- A End LOA/CFA - Customer/A End port assignment provided name based on a standard Telco naming convention for the location of their cross connect termination.
- Z End Company Name - Company that owns the Z Side/End of the Cross Connect.
- Z End Port Assignments - Z Side connection for the Cross Connect.
- Z End Connector Type - Type of cables used on the Z Side/End of the Cross Connect.
- Z End LOA/CFA - Company/Z End port assignment provided name based on a standard Telco naming convention for the location of cross connect termination.
- Expedite Install? - Request expedited installation service. Note: expedited services will charge additional fees.
- Customer Reference Circuit ID - Customer's internal reference ID for the Cross Connect circuit. This should be provided in the Additional Order Notes section.
- Additional Order Notes - Other information or details regarding the Cross Connect order.
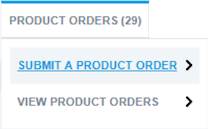
Submit a Product Order
The Product Orders menu bar application is how you will create and submit new Product orders.
Product orders are submitted by following the same process as a regular ticket submission:
- Step 1 - Select a Product Order Type
- Select Submit a Product Order from the menu bar.
|
 |
|
- Step 2 - Enter Product Order Details
- Enter information and details for the requested product.
- Click the Submit button.
|
 |
Customer Floorplan Usage
The floorplan shows the user their installed cabinets, temperature sensors, live camera views, and power draw (kW) of their cabinets, by Data Hall.
When power is shown, it is showing the last available reading from a historical log which will be within the last 15 minutes.
The scope of what a user can see is determined by the User's Company Adminstrator.
User interactions include:
- Selecting a different site from the dropdown for quicker navigation.
- Selecting / toggling which floorplan elements that are visible.
- Switching data halls if customer is present in more than one.
- Clicking a camera for a live view.
-
Data View Analysis of selected temp sensors or cabinets.
Data View Analysis Click actions are described by the information button.
Once in the Data Viewer, the user may change the date to view more data up to 6 months prior.
The floorplan view of cabinet data is summarized by a table below the floorplan graphic with a summarization of utilization as well.
Circuit Power Loads
The circuit power loads shows the user the circuit pairs assigned to a redundant cabinet.
It will show only those cabinets that are deemed to be of concern in case of a single side failure.
It is incumbent upon the user to check these periodically and to address any issues they may deem to be of importance.
The question mark over the combined load label describes the calculations being shown.
The items marked in yellow are a visual indicator of why that circuit pair was selected for display.
User interactions include:
- Selecting a different site from the dropdown for quicker navigation.
- Specifying a row to filter the data on screen.
- Searching and clearing a selection.
Company Administrator Functions
A company administrator is an EdgeOS user with administrative privileges over their specific organization within EdgeOS.
A user with the company admin role is responsible for:
- user account activation for portal access.
- site and role assignments of users/contacts belonging to their company.
Assigning sites and roles for company users/contacts limits information flow to just that information pertinent to the user successfully doing their jobs.
When a new site is added, the site is NOT automatically added to all the users.
EdgeOS will email the Company Administrators to notify them that they should modify the site list for each user appropriately.
Two-Factor Authentication
Two-factor authentication involves asking the user for both a primary and secondary form of authentication when logging into EdgeOS.
The primary form of authentication is to enter a username and password.
The secondary form of authentication is to also enter the value of a PIN code transmitted to the user as an SMS text message.
The Company Admin sets whether this is enabled for their company as a whole.
Overrides to the company setting for an individual user can be made by editing the user account details.
System Password Policies
Controls exist to govern acceptable password values when a user sets and/or changes their password.
These rules apply to new applicants as well.
The password policies are system level only and companies can opt in/out.
The setting is OFF by default.
The rules will apply to all users once the policy has been set.
Existing passwords will continue to work until there is a password change.
The system password policies are:
- Minimum length of 8 characters
- At least one uppercase character
- At least one lowercase character
- At least one numeric digit
- Last 4 passwords will be remembered (including current)
- 1 year history maintained
There will be no duration-related password expiration/renewal enforcement since studies have shown that sort of policy
leads to predictable user behavior that actually increases security risk of hackable passwords.
Processing User Requests
Once an account request is pre-approved by an EdgeConneX portal administrator,
the company administrator will then be notified and responsible for assigning the user's sites and roles.
The pre-approved account request will be accessible by the company administrator in the User Accounts Awaiting Activation
section of the Company Admin for [Company Name] administrative application that appears in the menu.
The company administrator will then click the highlighted name of the pre-approved user to open the user’s User Details page.
Maintaining Users and Contacts (Add, Change, Delete)
Definitions:
-
Contacts:
Do not have login privileges to EdgeOS.
They have limited roles that can be assigned and are primarily used for the purpose of monitoring inbound communications from EdgeOS Operators.
A typical example would be an inbound calendar processing account, NOC, or helpdesk.
-
Users:
Do have login privileges with the purpose of interacting with EdgeOS, and EdgeConneX operations personnel through tickets.
Adding a contact or user:
The administrator clicks the Add User or Add Contact button to add a new account.
Once the new account is added, an email will be sent to the user/contact about the registration asking them to set the password for their new EdgeOS account.
A hyperlink is included in the email that will direct them to the EdgeOS website.
The administrator must:
- accurately fill in the information about the user or contact.
- identify the roles/permissions applicable to that user or contact.
- identify the sites applicable to that user or contact.
- click the Activate button to add the new user or contact account.
Adding Sites to one or more users:
In the company admin portal, a list of users and contacts is displayed.
- To change a single user's site list, click the username.
A new page of roles and sites will be displayed.
Choose the appropriate sites, then click save.
- To change multiple users' site list, click the show sites link in the header of the table.
All users will be listed in rows, and all contracted sites are listed in columns.
Click the appropriate checkboxes.
Changes are immediate.
User Roles:
User roles are self-explanatory and only pertain to sites assigned to that user.
User roles include:
- Receive Incident Notifications
- Receive MOP Notifications
- Receive Ticket Notifications
- Submit a Ticket
- Submit an Access Ticket - default is yes
- Display Floor Plan Cabinet utilization colors
- Display Floor Plan Cabinet load values
- View Cameras on Floor Plan
- Ability to see Pertinent MOPs
- Circuit Power Balancing
- Personnel On-site Finder
Archiving and Unarchiving
Renew Portal User Inactivity Expirations
User Settings and Functionality
Each user can control personal information about themselves as well as some emailing preferences.
However, a user cannot change what sites and roles they are assigned to by the company administrator.
These changes are restricted to the company administrator role and can be requested through the Email Company Admins functionality in EdgeOS.
Users access their settings by clicking their name in the upper right corner of the EdgeOS application.
Emailing Company Administrators
The user can email all their Company Administrators by clicking on their name and selecting Email Company Admins.
A simple email form will be displayed allowing the user to send direct email communications to all of their company administrators.
Profile Settings
Users can change the following:
-
Default Geographic Region:
Defaults the map that is displayed upon startup as the Home screen for the user.
-
Default Time Zone:
Defaults the data viewer time settings to your preference.
-
Text Message Transport:
Get message deliveries from EdgeConneX via either SMS or WhatsApp.
SMS is recommended for phone numbers in the US.
Other locations should use WhatsApp, if possible.
-
Email Format HTML:
Tells EdgeOS to send either an HTML or plain text email to the user.
-
Email Calendar Attachments:
Tells EdgeOS to include ICS Calendar invite attachments to their email notifications for time based event communications (e.g. MOPs).
Reset Password
Users can reset their passwords by providing their existing password, a new password value, and then re-entering that new password value as a confirmation.
Periodically changing user passwords is recommended as a good security practice, but is not mandatorily enforced by EdgeOS at this time.
If the user has been expired due to inactivity on the account and then attempts to change their password,
the system will automatically reactivate that user account if the following conditions are met:
- User is currently INACTIVE
- User is NOT archived
- User deactivation caused by auto-expire
Forgot Password
On the login screen, users who have forgotten their password may click the link that says Forgot your password?.
A secondary screen will be displayed asking for the email of your user account.
An email containing a hyperlink to the EdgeOS website and a new temporary password for that user account will be sent to that email.
If you do not receive the email, please check your spam filters.
Once the email is received, your login and temporary password should be entered into the EdgeOS portal main screen.
You will then be prompted to set a new password for your user account.
Field Definitions (Core)
The fields below can be found on most tickets.
They represent a common core of information required for proper handling of the ticket.
Those core fields are:
| Entry Field |
Description |
| Site Location |
The Edge Data Center for which the ticket applies. |
| Behalf Of |
The company that assumes the ultimate responsibility for the ticket. |
| Subject of Your Message |
Condensed information that helps to identify a ticket. |
| Description |
Detailed account of the ticket. |
| Email |
The ticket submitter's email. |
| Contact Name |
Name of the point of contact for the ticket. |
| Contact Phone |
The phone number of the point of contact for the ticket. |
| Additional Contacts |
List of email addresses that you choose to receive information pertaining to the ticket. |
| Customer Internal Ticket # |
An internal reference number provided by the customer that refers to an identifier in a customer system. |
| Remote Hands |
Ticket requires technical or non-technical Remote Hands within data center. |
| Service Interruption |
Service Affecting - The visit will affect the requirements of the service level agreement ECX has with its customers.
-OR-
Service Non-Affecting - The visit will not affect the requirements of the service level agreement ECX has with its customers.
|
| Severity of Issue |
Non-Critical or Critical: A determination by the ticket submitter as to the level of criticality of the work to be performed. |
| Status |
There are four statuses a ticket can have:
- Open - A ticket is considered Open as soon as it is submitted. Tickets that are Open have not been acknowledged or received work by an ECX Regional Director.
- In-Progress - A ticket is In-Progress as soon as an ECX Regional Director acknowledges it and work has begun to resolve the issue.
- Cancelled - A ticket is Cancelled when it work is no longer needed.
- Completed - A ticket is Completed or Closed when the issue that the ticket was in regards to has been resolved through requested work.
|
| Rack/Cage |
The specific location of racks or cages. |
| RU# of equipment |
The specific Rack Unit number of the equipment for which the work is to be performed. |
| Requested Target Date |
The date that the user wants to have the visit authorized for. Because it is a requested target date, it is not a guaranteed set date. |
| Attached files |
One or more files may be attached to a ticket. Files can provide drawings, schematics, instructions, or other useful information. |
| Create Shipping & Delivery Ticket |
Creates a related Shipping & Delivery ticket to any (except individual Shipping & Delivery tickets) type of ticket submittal.
Opens a new Shipping & Delivery ticket after ticket submission.
A reference is made between the two tickets and can be seen by viewing the submitted Ticket Details for either ticket.
|
Field Definitions (Non-Core)
The below fields are ticket-specific.
The non-core fields are listed below with their corresponding ticket type.
| Ticket Type |
Field |
Description |
| Authorize Site Access: PIN Request |
Company Name |
Enter the name of the company or organization the individual is a representative of. |
| Authorize Site Access: PIN Request |
Cell Phone |
Enter the cell phone number of the individual. |
| Authorize Site Access: PIN Request |
Country |
Select the country that the individual is a citizen of. |
| Authorize Site Access: PIN Request |
Email Address |
Enter the email address of the individual. |
| Authorize Site Access: PIN Request |
ID Type |
Select the type of legal identification the individual has:- Military ID
- Passport
- State Driver's License
|
| Authorize Site Access: PIN Request |
ID Number |
Enter the ID number for the individual's selected ID Type. |
| Authorize Site Access: PIN Request |
Photo |
Attach a photo of the individual. |
| Authorize Site Access: PIN Request |
Duration of Visit |
Select the amount of time that the individual's PIN access will last for. |
| Authorize Site Access: PIN Request |
Data Centers |
Check the boxes of all of the occupied data centers the individual will have access to. |
| Authorize Site Access: PIN Request |
Other Instructions |
Enter other instructions or notes in regards to the request for PIN access.
These may and can include requests like: non-standard durations or requests for specific area.
|
| Remote Hands |
Special Equipment |
Unique or out-of-the-ordinary equipment that will be required to perform the work specified in the ticket. |
| Shipping & Delivery |
Expedite |
Specify if the delivery will require expedited shipping.
By clicking the checkbox, a pop-up window appears to advise, "Additional Charges will be applied for expedited shipments."
|
| Shipping & Delivery |
Delivery Date |
The date that the shipment will be delivered to the data center. |
| Shipping & Delivery |
Delivery Time |
The time that the shipment will be delivered to destination. |
| Shipping & Delivery |
Tracking # |
The identification code for the shipment. |
| Shipping & Delivery |
Carrier |
The name of the carrier servicing the shipment |
| Shipping & Delivery |
Notes |
Other relevant and important information regarding shipment. |
| Shipping & Delivery |
Delivery Address |
The destination address that the package will be shipped to. Only available for Shipping from a Data Center ticket. |